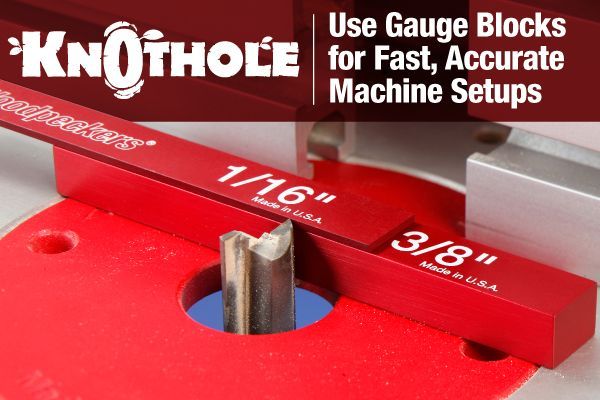
Woodworking machine setup is often most easily accomplished using gauge blocks. These precision-machined blocks are perfect for your table saw, router table, drill press, band saw and other shop equipment. Using gauge blocks (sometimes called setup blocks) can eliminate the often tedious process of getting a saw blade or router bit set precisely. Hands down, they beat more traditional measuring devises like rulers and tape measures.
There are a number of reasons setup blocks are superior. Say you want to set the depth of cut on a plunge router. Some woodworkers will make an approximate setting then try to measure it by bridging over the router base to the tip of the bit using a combination square. Then a series of bit adjustments are made (awkwardly, I should add) until they are ready to make a test cut. Often, further adjustment is necessary.
A second method for setting depth of cut involves the use of the router’s depth stops and adjustment rod. First, the bit is set until the tip touches the surface of the router is resting on. A ruler is then used to measure, then adjust, the distance between adjustment rod and depth stop. This is a difficult reading to take for a couple reasons. First, most plunge routers offer little space to insert a ruler to take the reading and at best, the corner of the ruler is all that’s resting on the depth stop. Second, you’ll need to bend over and view the measurement with your eye dead level to the ruler at the measurement mark your trying to read. If not dead level, reading will be either too great or too small. This phenomena is called parallax and occurs regularly when reading rulers.
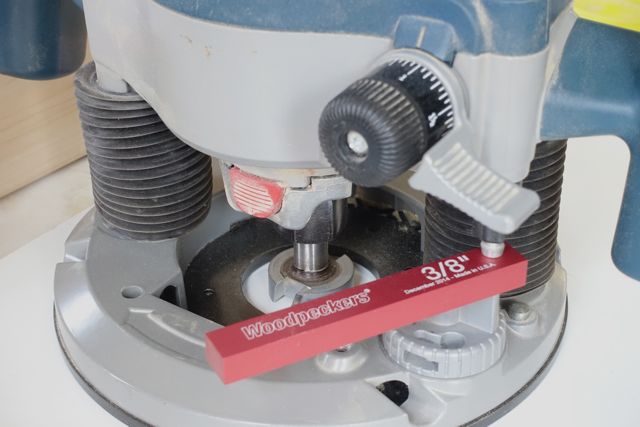
Now consider the ease and simplicity of using a gauge block. Choose the gauge block size that matches the desired depth of cut; say 3/8”. Zero out the router bit as before on the surface the router is resting. Next, insert the gauge block so that it rests on router depth stop. Lastly, drop the adjustment rod until it contacts the gauge block. Lock the adjustment rod in place and the router is perfectly set to cut to a 3/8” depth.
More Uses with the Router
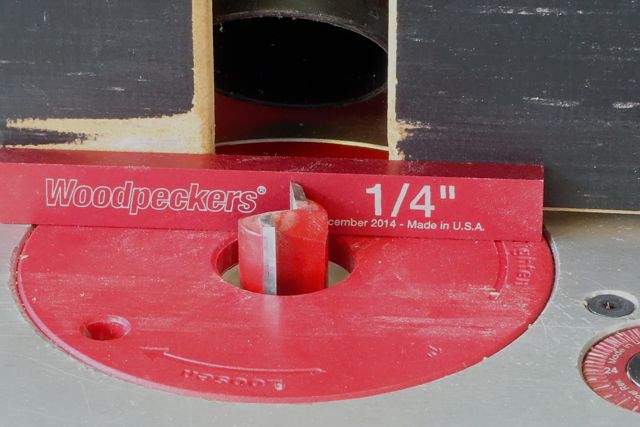
At the router table, setting the bit height adjustment is a cinch. All that’s necessary is laying the desired height set up block next to the router bit. Now adjust the bit up or down until the tip of the bit is set exactly at the top edge of the block. You will be amazed that settings within a few thousands of an inch can be made this way relying on both you eye and the touch of a finger. Want to set the distance from the bit to the fence? It’s easy. If the distance is less than the diameter of the bit simply bridge the block between the infeed and outfeed fences above the bit. Now slowing rotate the bit until it reaches it’s maximum swing away from the fence. Now you can easily adjust the fence to a perfect setting.
At the Table Saw
Gauge blocks are used to set precise settings in the range of 5” or less between the blade and fence. Just slip block, or combinations of multiple blocks, between the two and adjust the fence until the blade allows the block to pass between while only ever-so-slightly touching the blade. It’s also easy to set the height of the blade using a setup block. Sometimes it’s necessary to set the fence to a given distance to the outside of the blade. This is easily done by selecting a block that’s equal to the desired distance minus the blades kerf cut thickness; usually 1/8” for standard blades or 3/32” for thin-kerf blades.
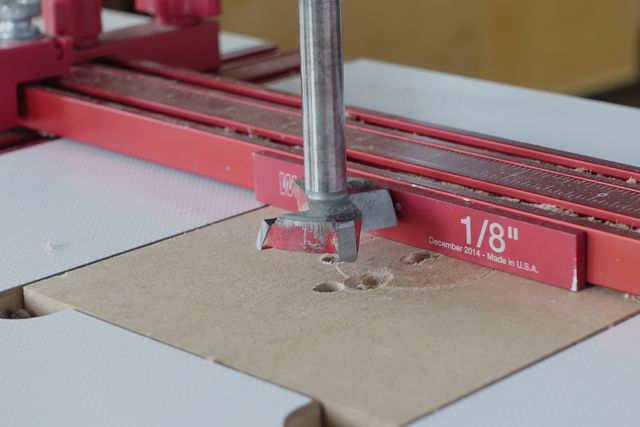
Some of the same techniques applied to router table setup can be employed at the drill press. To set an accurate depth of cut, loosen the depth stop mechanism and lower the drill bit to work to be bored. While holding the drill bit in place, insert the gauge block between the depth stop and adjustable depth of hole adjusters. When the adjusters meet the stop gauge the setting is complete.
You can also set the drill press fence distance from the bit using the setup block. Simply select a block that equals the desired hole-center minus one-half the diameter drill bit. For example, to position the fence to drill a ½” hole centered 1” from the edge use a ¾” block.
Set up blocks are the “go to” measurement device for many woodworking machines. In addition to the examples discussed here you’ll discover dozens more applications in your woodworking shop.
About the Author: Steve Shanesy was editor and publisher of Popular Woodworking magazine for 19 years. Prior to that he spent 15 years working in and managing high-end furniture and cabinet shops in Los Angeles and Cincinnati.
Editor’s Note: Woodpeckers has designed and manufactured gauge blocks/setup blocks in the past as part of our very popular OneTIME Tools product line. None are available currently but it’s always possible that we’ll bring these helpful measuring devices back around at some later date! Thank you for reading.